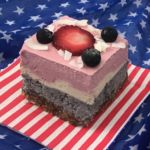
Red, White, and Blue Vegan Cheesecake
Delicious, festive, and cool in the July heat — this Red, White, and Blue Vegan Cheesecake is the perfect dessert for your Fourth of July barbecues and gatherings! No baking necessary, which is always my preference this time of year!
Servings 9 squares (see notes for instructions on cutting this recipe in half)
Ingredients
For the crust...
- 1 cup pecans or almonds (approximately)
- 1 cup pitted dates (approximately)
- pinch sea salt
For the blue layer...
- 1 cup blueberries, plus more for decorating
- 1 cup *raw cashews soaked for at least 4 hours (overnight if not using a high-speed blender)
- 1/4 cup + 2 Tbsp coconut oil
- 1/4 cup **coconut cream
- 3 Tbsp lemon juice
- 2 Tbsp 100% pure maple syrup or to taste
- blue vegan food coloring (optional)
For the white layer...
- 1 cup raw cashews soaked for at least 4 hours (overnight if not using a high-speed blender)
- 1/2 cup unsweetened, coconut flakes or shredded coconut, plus more for decorating
- 1/4 + 2 Tbsp coconut cream
- 1/4 cup coconut oil
- 1/4 cup 100% pure maple syrup
- 2 Tbsp lemon juice
- 2 tsp coconut extract
For the red layer...
- 1 + 1/4 cup strawberries, plus more for decorating
- 1 cup raw cashews soaked for at least 4 hours (overnight if not using a high-speed blender)
- 1/4 cup + 2 Tbsp coconut oil
- 1/4 cup coconut cream
- 2 Tbsp lemon juice
- 2 Tbsp 100% pure maple syrup or to taste
- red vegan food coloring (optional)
Instructions
- Place all crust ingredients into the food processor and mix on high until it looks like crumbs. Test to see if a dough can be formed by pressing the "crumbs" between two fingers. If the mixture is too dry, add a few more dates — if too moist, add a few more nuts.
- Line a *deep 8" x 8" baking dish with parchment paper, leaving the paper long on the sides to grab and pull out later. If leaving two sides of the baking dish bare, make sure to oil them thoroughly. Transfer the crust mixture into the baking dish. Spread the mixture evenly and press down to form a crust. Place the baking dish into your freezer.
- Add all blue layer ingredients into your blender (preferably a high-speed) and blend on high until smooth. You can add a few drops of vegan food coloring to attain more of a blue color if you desire. I added a little at a time until I reached my desired coloring. Remove the baking dish from the freezer and pour your blue layer on top of the crust, spreading evenly with a silicone spatula. Transfer baking dish back to the freezer before continuing.
- Rinse out the carafe of your blender and next add in all white layer ingredients. Blend on high until smooth. Remove baking dish from the freezer, pour the white layer on top of the blue layer, gently spread the top to make it even and immediately transfer baking dish back to the freezer.
- Add all red layer ingredients into your blender (since the precious layer was white it's up to you whether you care to rinse it out this time). Blend on high until completely smooth. If desired, add drops of vegan food coloring to acquire more of a red color. Remove the baking dish from the freezer, pour the red layer on top of the white layer. Gently, smooth out the top with a silicone spatula and place the baking dish back into the freezer until cheesecake is completely frozen (I made this in the evening and left it in overnight).
- Remove cheesecake from the freezer and let it sit at room temperature until the edges look defrosted (about an hour). Take a knife and run it along all the edges to separate the cheesecake from the sides of the baking dish. Grab onto the parchment paper at each side and lift the cheesecake out transferring it onto a cutting board.
- Cut the cheesecake into 9 equal squares. Now place the cheesecake, on the cutting board (or in another dish but one that's big enough to leave a little room between each piece) into the refrigerator until completely defrosted. This could take up to 3 hours, depending on how frozen your cheesecake is and the temperature of your fridge.
- Remove the cheesecake from the refrigerator and decorate with strawberry slices, blueberries, and coconut flakes. The berries can be gently pressed into place. The cheesecake can now be enjoyed or keep in the fridge until ready to serve. Happy 4th!
Notes
*Because cashews are pricey and 3 cups is a lot, feel free to cut this recipe in half and prepare in a loaf pan instead! When done, the cheesecake can be cut into bars or six to eight smaller squares.
If making the whole recipe, you can instead use a 9" x 9" baking dish (rather than a deep 8" x 8") but layers will be thin.
**For coconut cream, refrigerate a can of coconut milk overnight and scoop out only what is solid after refrigerating. For me, one can was the perfect amount, but it can vary depending on the brand coconut cream (I used Thai Kitchen). You can refrigerate two cans, just to be safe, or minimize the coconut cream in the white layer to only 1/4 cup. Coconut cream is sometimes also sold individually in smaller cans.