
¡Feliz Cinco de Mayo! In honor of today’s holiday, I present you with my newest version of one of my favorite Mexican dishes. Chile Relleno Squares, kind of a cross between a chili relleno, and a… well… I’m not exactly sure, but they are very yummy, vegan, and gluten/grain free. Oh, and if you have an air fryer, even better, you can cut out all that oil needed to fry them in, but both methods work, and both are delicious.
Chile rellenos have always been one of my mom’s favorite things to order when eating out at a Mexican restaurant. As a kid, I wasn’t a fan of green chilies, and thought, please forgive me for this, I thought they looked disgusting. It took me a very long time to realize just how wrong I was. I had to of been in my 30’s already. We’d gone out to eat with some friends one night, at a Mexican restaurant, in Del Mar. I wasn’t vegan yet and decided I’d cheat on the carbs that night. I remember there were two items on the menu that I really wanted, but the combo that came with them both included a chili relleno as well. I didn’t want a chili relleno, and my husband couldn’t eat it because of the gluten, but one of our friends with us said she’d take it off my hands if I didn’t want it. Well, I made the mistake of tasting that sucker before handing it over to Sylvia. I ate the whole thing. In fact, it was my favorite item I ordered that night, and I don’t even remember what the other two items were.
After that, I had to find a healthier version with lower carbs, and which also didn’t contain the gluten. That way we could all enjoy them at home. I found a recipe called Chile Relleno Bake. It was grain free, and you made it in a casserole dish. I suppose it was similar to a frittata. Although, even though it did contain a lot of eggs, it really didn’t have a super eggy taste. The only thing it was missing, was the sauce. I’m very saucy! I started using the sauce from this recipe, which is the same as I what I still use. It became one of my favorite dishes to make! Once becoming vegan, I had to find a good replicate! One that really was healthy, without all those animal proteins!
It’s been a challenge trying figure that one out, and I only just discovered the answer quite recently. My first attempt came within just a few months of being vegan. Since the first recipe was similar to one of a frittata, my initial idea was to try using tofu in a way similar to a lot of vegan frittata recipes. This turned out just okay. We liked it, but it wasn’t amazing, and I wasn’t convinced it was my answer.
After that first attempt, I wouldn’t say I stopped trying, I’d always be thinking about it, but never really made the effort to go for it again. Then maybe only about a month ago, the answer finally hit me. The batter for the chickpea “tofu”! It would totally work, I knew it would. I could let them set in a casserole dish and assemble them all at once like the bake I used to make. Only I’d then cut them into individual squares and fry them to get the outside crispy like a traditional chile relleno. Even better! This batter I know gets really nice and crisp, and that’s exactly how I wanted them cooked. I’d just have to mix up a yummy spice blend to add to it all, and it’d be perfect!
So you may be wondering, “What about the cheese?” That portion of the puzzle I actually solved a long time ago. Have you ever had Miyoko’s Creamery Fresh Vegan Mozz? My first time using it, I remember I was making an eggplant “noodle” lasagna. When layering on the cheese I had to take a little taste. Right away I was reminded of that mild flavored Mexican queso, which I used to use when making that chile relleno bake from the past. This vegan cheese is rather pricey, but it goes a long way. Plus, the way I see it, veggies are cheap, so I can spend a little extra on an animal and planet friendly dairy substitute. Also, Miyoki is not only saving you from the dangers of consuming animal proteins, and all the antibiotics they’re adding to the meats these days, but unlike many “fake” cheeses, it has a short list of ingredients, and I know what they all are. Hospital bills are expensive too.

I learned the hard way, that if you want to slice or shred the Miyoko, to freeze it first. Otherwise, it’s very soft and hard to work with. I always keep one in my freezer. I’ll pull it out and place in the fridge in the morning, and it’ll be perfect to slice or crumble in the afternoon/evening for making dinner. I don’t always think this far ahead (or let’s be honest, I forget), and you can grate it straight from the freezer as well, or shave it with a sharp knife.
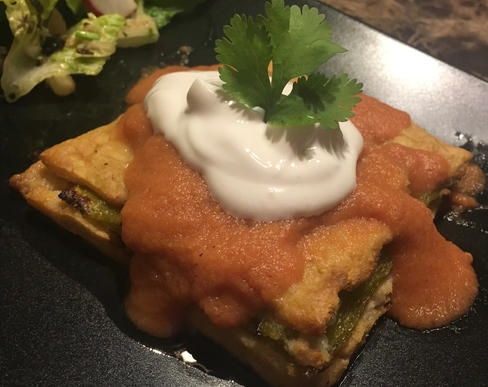
Last week, I gave these chile relleno squares a go for the first time. Luckily, only three of us were home for dinner that night, otherwise, we’d have run out. We all went back for seconds! So yes, they were scrumptious, but that’s not to say I didn’t have a couple areas to perfect. I tried them, three ways, air fryer, oven, and skillet. Air fryer and skillet methods worked out great and nicely crisp. I didn’t quite like the way they turned out baked, so I don’t suggest that. I made them again last night, to work out the rest of the kinks. Oh yeah, and because I wanted more!
All the flavors were spot on, the texture was just right, and as I said, in both the air fryer and in a skillet, they crisped up perfectly. I did learn a couple things, both resulting in one problem, they are fragile before and during the cooking process. That being said, my first tip, DO NOT skip the parchment paper! Before cooking, these yummy squares set in a baking dish (or a high rimmed cookie sheet), and they were really hard to take out with the spatula, even though I’d used cooking spray. The parchment paper makes taking them out of the baking dish, a much easier process. Secondly, I learned to leave space between the chilies, so you can cut out the squares without cutting into them. The first time, I didn’t bother leaving space between them, only along the edges, inside the perimeter of the pan. It makes a pretty picture, to be able to see the nice layers inside, however, it makes it harder for these to hold together. Depending on the size of your chilies, you may have to trim them down some, so they don’t touch. Other than those two tips, just be careful when flipping and moving them around. However, even if you do get one that doesn’t hold, they all taste the same once crisped up and topped with sauce!

Let me know when you’ve made this dish! Leave a comment below, or tag me on Instagram, @veggiesattiffanis. Okay, we have a fiesta to get to, let’s cook!
Vegan Chile Relleno Squares
Ingredients
- 12 canned green chilies I originally said one 27 oz can, or 3 small cans, however, I learned that this varies depending on the brand. Some have larger chilies with less in them. You can use the pieces you trim in place of whole chilies. You can also roast your own.
- 1 cup chickpea flour
- 2 Tbsp coconut oil
- 2 cups water
- 1 Tbsp spice mix recipe below
- Miyoko Creamery VeganMozz I didn’t use a whole 8oz package, about 3/4
- Chile relleno sauce recipe below
- Vegan sour cream optional, I like Follow Your Heart or Tofutti Sour Supreme, or you can make my cashew cream which is found here.
- Cilantro optional, for topping
Chile Relleno Squares Spice Mix:
- 2 parts paprika
- 2 parts onion powder
- 2 parts garlic powder
- 2 parts cumin
- 2 parts dried oregano
- 2 parts coriander
- 2 parts nutritional yeast
- 1 part sea salt
- 1 part chili powder
- 1 part chipotle powder can substitute cayenne
Chile Relleno Sauce:
- 11/2 lb Roma tomatoes halved
- 3/4 medium white onion cut in slices
- 4 garlic cloves peeled and smashed
- 2 serrano chilies stems removed and sliced in half, lengthwise
- 1 1/2 tsp lime juice
- 1 1/2 tsp kosher salt
Instructions
- Drain your green chilies. Slice down one side of each chili to open. Scrape out seeds, rinse, and pat dry. Check the size of your chilies compared to your *baking dish (13″x9″) and trim chilies if needed, so you can lay out 6 chilies without touching and leaving a little room in between. Trim chilies as needed. There will be two layers, so you will need to do this with 12 chilies. If you want larger squares you can use a larger dish or a deep cookie sheet, but you’ll need to multiply the chickpea flour ingredients (flour, oil, water, spice), by maybe a quarter or a half, depending on how large of a space you are covering.
- Grate, crumble, or slice your cheese, making sure it’s ready to grab.
- Line a 13″x9″ baking dish with parchment paper, then spray or rub paper and sides with cooking oil. Make sure enough of the parchment is sticking out from both sides of the dish, to easily lift out contents later.
- Take half the chickpea flour, half the coconut oil, half the water, and half the measured amount of spice mix and put them in a medium saucepan. Once all ingredients are in your pan, turn the burner to medium-high and whisk continuously until mixture starts to thicken. Once the mixture thickens, spoon into your lined baking dish and spread evenly with a spatula. Quickly lay six of the chilies on top, leaving space in between. Gently press, and then sprinkle each with some of the cheese. Next lay the other six chilies on top. I alternated directions with the second layer of chilies so that the pointed end of each bottom chili is at the straight end of each top chili so that the two layers together almost make a square shape. After this, I topped them all with a little more cheese.
- Working fast repeat the beginning of step 4 with the remaining flour, oil, water, and spice. Once ready spoon on top of your chilies and cheese. Then very carefully smooth out with a spatula, as good as possible. Press down along the edges, to seal the two layers some. This will now need to sit and firm up for 20-30 minutes. The quicker you get the second layer of batter on these, the better they should hold together, so it is important to work fast.
- While those sit, make your sauce. Line a baking sheet with aluminum foil and lightly oil. Scatter tomato halves (skin side up), onion slices, garlic, and serranos (skin side up) over the baking sheet, and place under the broiler on high, for about 7 minutes. The tomatoes and chilies should be starting to blacken and blister. Remove from oven. Depending on your spice level preference, and the heat of the chilies, I’d set aside one or two of the chili halves. Then place the rest of your broiled veggies to your blender along with the remaining sauce ingredients. Blend on high until smooth. Taste and add more chilies if desired. I usually like 1 1/2, but sometimes use more or less depending on the individual chilies. Once ready, transfer to a saucepan and set on stove to reheat later.
- After your pan of layered batter and chilies have sat and firmed up for about 20-30 minutes, carefully lift out of dish using sides of parchment paper. Now take a knife and cut around each chili, creating individual squares. They’ll be covered, but you should have a good idea where each is located.
- For cooking squares, you have two options, I actually do both methods at the same time, so I can get more down at once. I preheat my oven to 250° to keep finished chilies warm while the rest are still cooking. If using air fryer, have it preheated to 370°. Lightly spray the bottom and your multi-level rack with cooking oil. Carefully place one square on the bottom and one on the top rack. These will take about 10 minutes, however, my bottom layer always takes a little longer. If using a skillet, heat olive oil, over medium heat, and fry each side for approximately 3 minutes. Be very careful when flipping, so they stay together. If using air fryer, flipping isn’t necessary. Keep finished squares warm by placing on a parchment-lined baking sheet in a heated oven.
- Once the last of your squares are soon to being done, reheat your sauce. For serving, top each chile relleno square with sauce, a dollop of vegan sour cream, and cilantro. Enjoy!