
My friends go nuts over my desserts, so I decided it was time for me to share one of my recipes with you. Chocolate and coffee are my two most beloved flavors, which is why I went with a mocha cheesecake for today’s post.
I’ve made plenty of vegan cheesecakes, both bake and non-bake, but never one that was mocha flavored. I was really excited to try this, because… yum! I was, however, a little nervous, knowing I’d be so disappointed if they didn’t come out as I had hoped. To my delight, they were just as any dessert should be — sinfully delicious!
I knew what to use for the crust because I’d just made some scrumptious, Oreo cheesecakes for my non-gluten-free friends, and thought the same crust would work just as nicely with this recipe. I knew I wanted to use the same drizzle I’d made for that one as well.
I can do a standard no-bake cheesecake base, but it was the mocha flavoring that worried me. I knew to try cacao powder and Nescafé Instant Coffee, but it was the amounts that scared me. Then, how much sweetener (maple syrup), and is the lemon (which is what usually gives a vegan cheesecake it’s cheesecake tartness) going to work with mocha, or is that just weird? These were the struggles I had in my head.
The answer to it all? I started with the ingredients I knew I needed, the ones with amounts that wouldn’t change regardless of the cheesecake variety. Then I added small amounts of the rest, little by little, until I got it right. I’m pleased to say, they turned out spot on.
With the ingredients down, the process is fairly simple. You do have to give yourself plenty of time beforehand because you have quite a bit of waiting time between each step, but the actual work isn’t hard at all.
Step one: Soak your cashews. I put mine in a bowl filled with water before going to bed Friday night and stuck them in the refrigerator. Is that hard? Not at all, but it’s one of those things you have to plan for. You don’t necessarily need to soak them overnight unless perhaps you’re going to try and use a standard blender, rather than a high-speed. The longer they soak, the easier they blend.
I didn’t actually end up starting my cheesecake until Saturday afternoon, so I could have started soaking my cashews that morning. I try to do it early so I know it gets done and that I don’t forget. If you do cut the time, make sure they soak for at least four hours and that you use very hot water.
Before you can make your cheesecake filling you need a crust to put it on. Pulse almonds and dates in your food processor with a pinch or two of salt until it forms a dough. Once your dough is made, mix in chopped chocolate chips. Stir them in at the end — I once processed the chocolate chips in with the rest of the ingredients and I didn’t like the way it turned out nearly as much. You will then press your crust into the bottom of a 9-inch-by-9-inch baking dish lined with lightly oiled parchment paper.
To make your filling, put all the ingredients into your high-speed blender and blend on high until smooth. Easy peasy, right? Who ever thought making cheesecake could be so easy? Pour this onto your crust and place the baking dish in the freezer. I again left it in overnight, but you really only need to let it freeze until the cheesecake is well frozen.
Now that our dessert is frozen, we will want to unfreeze it. I know, silly right? I pulled mine out in the morning and let it sit on the counter for about an hour while I made breakfast. After about an hour, it should be ready to cut. You don’t want it completely defrosted, but soft enough to cut without difficulty. If you wait too long, I imagine this could get messy.
Before cutting the squares, you want to lift the cheesecake out of the baking dish. Do this by holding each side of the parchment paper and lifting. I then cut mine into nine equal squares, but you’re welcome to make these into whatever size you wish. Little, bite-size cheesecakes can be nice. For me, having smaller pieces helps satisfy a sweet tooth without overindulging. Also, bite-sized squares are better for sharing with a larger crowd. Today, I decided we were just going to go for it and embrace our dessert.
After I had the cut, I placed them back in the refrigerator to finish defrosting. You can speed things up by leaving them on the counter, but when left out at room temperature, they will continue to get softer, so make sure not to leave them out for too long.
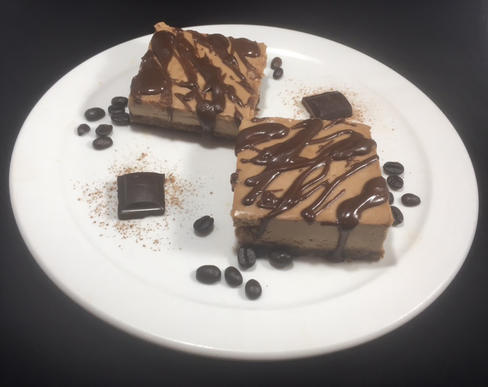
Now they’re almost ready to eat, we just need a little chocolate drizzle for the top. I spaced my squares out on a cutting board so when I topped them with the drizzle there’d be room for it to trickle down the sides of them as well.
To make the drizzle, simply add chocolate chips, almond milk, and maple syrup to a double boiler and whisk until melted and smooth. Then you’ll decorate your treats while the drizzle is still warm. If you don’t have a double boiler you can always do what I did by placing a metal mixing bowl into a saucepan with water. This works just as well.
Once drizzled, place your cheesecake squares back in the fridge until the drizzle cools and gets firm. This does not take long, and soon they’ll be ready to enjoy. I hope you enjoy these just as much as I do! If you love both chocolate and coffee like me, I’m certain you will!


Mocha Cheesecake Squares
Ingredients
For the crust...
- 1/4 cup vegan semi-sweet chocolate chips (for soy-free try Enjoy Life) chopped
- 1 1/4 cup raw almonds
- 1 cup dates pitted
- sea salt a pinch or two
For the filling...
- 3 cups raw cashews soaked overnight (or at least 4 hours in hot water)
- 1 cup *coconut cream
- 3/4 cup coconut oil melted
- 9 Tbsp (4 1/2 oz) pure maple syrup
- 3 1/2 Tbsp lemon juice
- 3 Tbsp cacao or cocoa
- 3 3/4 tsp Nescafé Clásico Instant Coffee Dark Roast (This is ground finer than some instant coffees and absorbs better. I don't recommend using a different brand. It's available in decaf as well, but I haven't tried it for taste.)
- 3 tsp vanilla extract
For the drizzle...
- 3/4 cup vegan semi-sweet chocolate chips for soy-free try Enjoy Life
- 3 Tbsp unsweetened almond milk
- 2 Tbsp pure maple syrup
Instructions
- To make your crust, set the chocolate chips aside and add the remaining three ingredients to your food processor. Pulse until ingredients are combined enough to where you can form a dough with them between your fingers. If too dry, add more dates, and if too moist, add more almonds. Once a dough is able to be formed, stir in chopped chocolate chips. Be sure to stir these in and not process with the rest.
- Line a 9" x 9" baking dish with parchment paper and oil lightly, heavier on the two sides not covered in parchment. Press your dough along the bottom of the baking dish, making sure to cover evenly. You can now place this in the refrigerator until your filling is ready to pour in.
- Add all your filling ingredients into a *high-speed blender. Blend on high until everything is completely smooth. Pour the mixture into the baking dish on top of the crust. Place in the freezer overnight.
- Remove cheesecake from the freezer and let sit at room temperature for one hour. Remove from baking dish by holding onto the sides of the parchment paper and lifting. Set onto a cutting board and using a sharp knife, cut into squares of desired size. Some of this may still be frozen. Place squares in the refrigerator until completely defrosted, maybe another hour at the most. You may leave the middle pieces, which would be more frozen, at room temperature if you like, but don't let them get too soft. When covering squares in the hot drizzle you don't want these to melt.
- Arrange squares on a cutting board to prepare for drizzling. If you want some of the chocolate down the sides of your squares, make sure they aren't touching. Using a double boiler, over medium heat, whisk together drizzle ingredients until smooth. Using a spoon, drizzle mixture over your cheesecake squares. Place cheesecakes back in the fridge to let the drizzle cool and firm up. This won't take long. Now your cheesecakes are ready to devour. Store leftovers in the fridge (if you have any). Enjoy!
I have not made this recipe on my own but I was able to taste this amazing all vegan Mocha delight that Tiffany has made. It taste so good you would not even believe that it is plant based. The Mocha was perfect and the crust was just too die for. This is definitely something I will make for my family in the future. If I could change one thing it would be to make two pans of this….so I won’t have to share with anyone! Lmao!
Thank you Tiamoya, I’m really glad you enjoyed them!
THE BEST DESSERT EVER !!!EVERYONE SHOULD TRY THIS ONE
EVEN IF YOU ARE NOT VEGAN !!!! <3
I really glad you enjoy them! Thank you!