
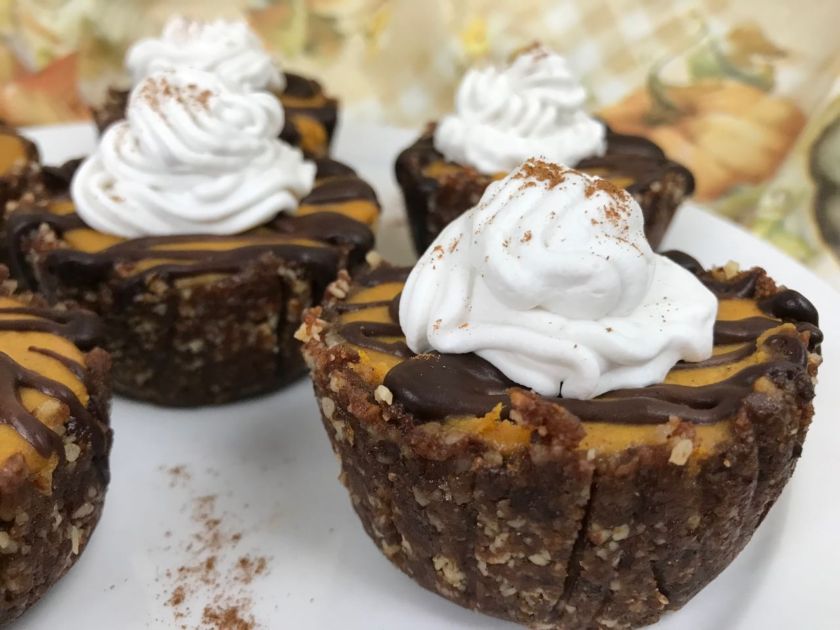
These no-bake mini pumpkin pies have a chocolate and cinnamon-spiced nut crust on the bottom, creamy and delicious pumpkin pie filling in the middle, and sinful chocolate drizzle on top. Add on a little coconut whipped cream, and you have perfection!
What I love most about these mini pumpkin pies is that they have that delicious pumpkin pie goodness, but not only vegan and gluten-free, they’re easy to make too! They do freeze overnight, so make sure to make them ahead of time, but the preparation is simple, and you don’t even have to buy cashews!

I’ve been patiently waiting for about a month to post these. Trust me; it’s been hard. These were so good I haven’t wanted to hold back, but I also didn’t want to jump the gun on Thanksgiving. Initially, I had planned to create a Halloween dessert. I ended up with pumpkin and chocolate to make orange and black for Halloween colors. Well, these little pies were where my creativity took me, and I decided they were perfect for Thanksgiving instead, sooo I had to wait a bit.
The crusts are made similar to a no-bake cheesecake recipe, using almonds and dates. However, I’ve also added chocolate chips and a bit of cinnamon to the mix, which definitely kicks these up a notch! The ingredients are all added to the food processor with an S-blade and mixed on high until a “dough” can be formed. Now you can line cupcake papers which are placed inside a muffin tin with it by pressing the “dough” down on the bottom and then up the sides as well.

To make the pumpkin pie filling you’ll again be using the food processor (or instead you can use a blender) so that will need to be rinsed and dried. Next, all the filling ingredients get added and mixed until smooth. For the filling you will need one can pumpkin puree, two cans coconut milk (though you will be using the cream part only), pure maple syrup, melted coconut oil, a little vanilla extract, pumpkin pie spice, and cinnamon.

When I first made these, once I mixed everything it tasted delicious, and just like pumpkin pie! My only hang up was the coconut oil. I think because the coconut oil is melted so it can be mixed well, and the coconut cream is so cold (because you need to first refrigerate the coconut milk for it to separate) I ended up with little firm pieces, like coconut chips. If you have the same problem, to fix this, simply transfer the mixture to a microwave-safe bowl, zap it on high for two minutes, and then give it a good stir.

After the pie filling is smooth, you can pour it into your crusts. Now stick the pies in the freezer and leave them overnight. Easy peasy and you’re almost done!

The next day, when you’re ready to make the chocolate drizzle, remove the mini-pies from the freezer and let them sit for about 20 minutes. Next, take them out of the muffin tin, remove the cupcake liners, and place them on a cutting board or serving platter (lined with parchment paper if you wish to keep chocolate off of the surface). To make the drizzle, you will add dairy-free chocolate chips, non-dairy milk, and maple syrup to the top of a double boiler (with water in the bottom pot) and whisk it over medium heat until melted and smooth. Now you use a spoon to drizzle the chocolate over the pies. When the pies are drizzled, place them in the fridge for 30 – 60 minutes to let the chocolate harden and the filling continue to defrost.

While the pies are in the fridge, you can make some coconut whipped cream for the top. For this, you will need more of the coconut cream (so another can of coconut milk which has been refrigerated overnight), vanilla extract, and some vegan powdered sugar. These items get whisked together with an electric mixer until peaks form, and well, it looks like whipped cream!
What I love about making coconut whipped cream is unlike dairy-based whipped cream, it stays firm. So you can decorate the tops of your pies, and even if some of them aren’t eaten for a few days, the cream on top will still look perfect!
To make things easier, you can instead use store-bought non-dairy whipped cream, though depending on which you buy, you may only want to distribute it onto the pies immediately before serving. To make mine look prettier, after topping with the coconut whipped cream, I sprinkled a little cinnamon on top. This, of course, is just for show.

I had these little pies taste-tested by several friends and everyone loved them! Can you say sound effects? Because I received plenty of, “Mmmm!“s LOL!
Vegan-made and omni-approved! I hope you enjoy these as much as the rest of us! If so, let me know by leaving a comment below, or taking a pic and tagging me on Instagram, @veggiesattiffanis. Happy Thanksgiving!

No-Bake Mini Pumpkin Pies w/ Chocolate n' Nut Crusts
Ingredients
For the crust...
- 1 3/4 - 2 cups raw almonds or more if needed
- 1 1/2 - 1 3/4 cups dates or more if needed
- 1/4 cup + 2 Tbsp dairy-free chocolate chips (soy-free, if necessary)
- 1 tsp cinnamon
- 1/8 tsp sea salt
- 12 - 15 paper (or foil) muffin liners
For the pumpkin filling...
- 2 cans *coconut milk Refrigerated for at least 24 hours, see notes.
- 1 15 oz can pumpkin pureé pure pumpkin, without sweeteners or spices
- 1/2 cup 100% pure maple syrup or more to taste
- 1/4 cup + 2 Tbsp coconut oil, melted
- 1 tsp vanilla extract
- 1 tsp pumpkin pie spice
- 1/4 tsp cinnamon
For the chocolate drizzle...
- 3/4 cup non-dairy chocolate chips (soy-free, if necessary)
- 3 Tbsp unsweetened/unflavored non-dairy milk
- 2 Tbsp 100% pure maple syrup
Optional for topping...
- Whipped Coconut Cream or buy pre-made non-dairy whipped topping of choice
- cinnamon (for dusting)
Instructions
- Add all crust ingredients to a food processor fitted with an S-blade, and mix on high until dough can be formed when the mixture is pressed with hands. If the mixture is too dry, add more dates. If the mixture is too moist, add more almonds.
- Line muffin tins with the paper liners and then start adding some of the "dough" to each cup. Firmly press the "dough" down to cover the bottom of the cup, and then begin pressing it up the sides until the entire muffin liner is covered with crust. Place tins in the refrigerator.
- Scoop the *coconut cream out of each can of refrigerated coconut milk (see notes). Add the cream, along with all remaining filling ingredients, to a large mixing bowl. Using an electric mixer, mix on high until well combined.
- Taste the pumpkin filling. If desired, add one more tablespoon of maple syrup (but no more to prevent the filling from becoming too thin). If you notice little hard pieces or "coconut chips," transfer mixture to a microwave safe bowl and microwave for two minutes or until smooth. If your filling is smooth to begin with, you can skip this step.
- Remove the muffin tins from the fridge and fill each crust with the pumpkin pie filling. Now place the tins in the freezer overnight.
- The next day, remove the pies from the freezer and let them sit at room temperature for about 20 minutes. Now, take each mini pie out of the muffin tins, remove paper muffin liners, and place pies onto a platter or cutting board.
- Heat a *double boiler on the stovetop with water in the bottom pot. Once water starts to boil, turn heat to low and add the drizzle ingredients to the top pot, whisking constantly. Once chocolate is smooth and ingredients are well combined, remove from heat. Using a small spoon, drizzle melted chocolate on the tops of the pies.
- Place pies in the refrigerator for 30 - 60 minutes to let the chocolate firm and the filling continue to defrost. If making a whipped topping, you can do that now.
- Top each pie with whipped coconut cream (if using) and if desired, dust with cinnamon. The pies will last 5 - 7 days in the refrigerator.