
This new cheesecake has a cinnamon-spiced nut crust — topped with a no-bake, maple-sweetened cheesecake filling seasoned with warm chai spices and rich coffee — and then dressed with a crumbled espresso topping. With a cheesecake this good, you’ll want to skip dinner and go straight to dessert!
I’ve definitely been known for having a fancy coffee as my dessert, so why not make a fancy coffee into a dessert? Sounds like the perfect choice for me! Though it is kind of funny to admit, I haven’t always been a fan of chai.

Back in the day, I was addicted to sugary espresso drinks and had at least one on the daily. Sometimes when I’d go to the Bistro, I’d also order one for my friend Cara and bring it to her at work. Cara’s drink was a dirty chai, and sometimes in the car, I’d accidentally take a sip of hers. Oh my goodness, what a shocker! LOL! I’d always have a caramelly mocha thing, and somehow I always thought hers was too sweet!
I’m not certain what changed and why I started liking chai, but I do remember it was after I got out of the habit of drinking so many of the others and visiting the espresso shop less frequently. Not to say I wasn’t still drinking tons of coffee. My afternoon drink ended up being a mix of the cold coffee which had been left in the pot from the morning, chai, and a splash of almond milk over ice. My coffee/chai ratio was 50/50, and you should definitely try it sometime!

Nowadays, I’m down to one cup of hot coffee (my first-thing morning coffee is always black — even in my sugary espresso days) in the morning with an occasional splurge of something sweet and special maybe once or twice a month. That’s not to say I don’t loooove them, I totally do, but I am happy to say I got out of that bad habit!
I guess I’m rambling, but my point being, I love coffee drinks. I always have, and even though I haven’t always loved chai, over the years, it’s definietly become a favorite! I still have to spike it with coffee or espresso, but mmmm… that’s so good!

I got the idea for this dessert right in the middle of the winter last year, and I decided it was too cold for cheesecake. As we’re beginning to enter the cold half of the year again, I decided I’d make it before it gets too late (I’m totally laughing at myself right now because I’m in San Diego. Such a cold winter!).
At first, I pondered if it was too late in the season for a cheesecake (you know, for those of you who live elsewhere), but when I started making it, I realized it was perfect because of all the warm fall spices in chai! There’s no better time of year for cinnamon and nutmeg! Yum!
To make this cheesecake, you do need to prepare ahead of time, but it is pretty easy. If you’ve ever made any of my cheesecakes, it’s pretty much the same process with the only difference being the flavors and the delicious, crunchy espresso topping.

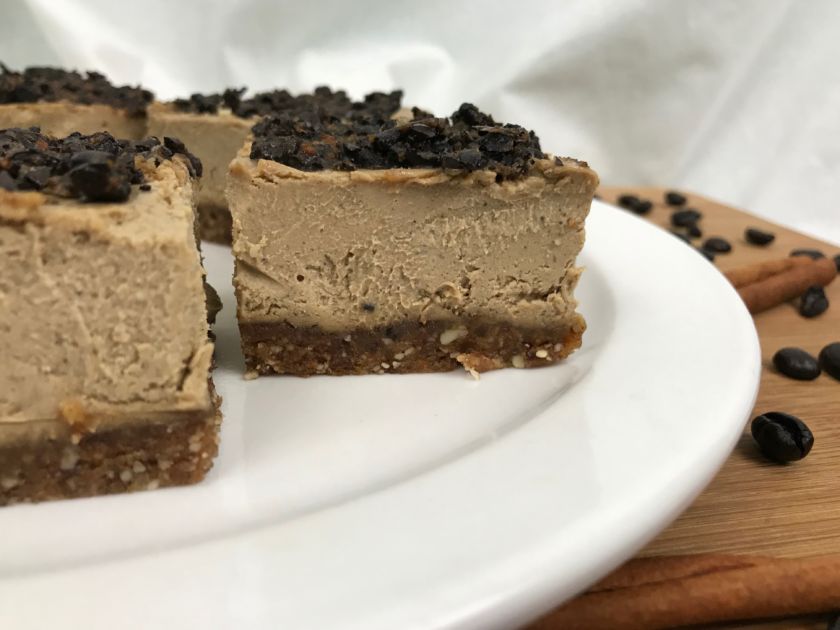
In my crust, I use almonds (or pecans) with a little cinnamon, dates, and a pinch of salt. These get mixed in the food processor until it is all broken down and can be formed into a dough. The “dough” gets pressed into the bottom of a nine-inch by five-inch loaf pan.

For the filling, you take soaked cashews, coconut cream, maple syrup, lemon, vanilla, a blend of chai spices, and instant coffee, and mix them in a high-speed blender until it is all smooth. If you do not have a high-speed blender, it is possible to get the mixture smooth, but you will definitely need to make sure to soak your nuts overnight and mix for a long time. Always make sure to scrape down the sides of your blender carafe too.

For the instant coffee, I buy Nescafé, and as I described in my post for my Mocha Cheesecake Squares, I believe it dissolves better than some brands do, which is why I prefer it. It’s what we used years ago in an ice cream shop to make milkshakes (yes, I used to serve ice cream, it was inside a diner I waitressed at. My non-vegan days) my boss swore it was the only brand that worked. I do go heavy on the coffee, but if that isn’t your cup of tea, add a little less, to begin with, and perhaps more to taste.

Once the filling for the cheesecake is made, pour it evenly over the crust, and stick the dessert in the freezer overnight, or at least until completely frozen. When morning comes, or whenever you get to it, pull it out of the freezer and let it sit at room temperature for an hour.

After an hour, you should be able to lift the cheesecake out of the loaf pan and onto a cutting board, grip onto the sides of the parchment paper. If it doesn’t seem to want to come out yet, leave it be a little longer, but don’t let it sit too long, they’re easier to cut when still partially frozen.

You can now cut your cheesecake into your desired-sized pieces. I either will do eight equal-sized squares, as you see here, eight triangular pieces like in my Coconut Lime No Bake Cheesecake, or I’ll cut them into six bars just as I do with my Lemon Cheesecake Bars.

If you don’t want to use a loaf pan, you also have a couple of other options. My first time making these, I instead used a cupcake pan. I only had one cup of cashews, so the whole recipe was reduced by one-third. I used cupcake liners, and when they’d defrosted, I removed the papers and smoothed out the edges. You can stick to the same portions and make nine cheesecakes, or double it and make 18. The only thing I didn’t like about doing it this way was that I wanted them to be a little taller.

Another option would be to double this recipe and use a nine-inch by nine-inch baking dish, just like my Mocha Cheesecake Squares which I linked to above. Those I usually cut into nine large squares, but you can cut them into whatever size or shape you prefer.

Once you’ve cut the cheesecake, let it sit a little longer while you make the topping. To the food processor, add melted coconut oil (but make sure it’s at room temperature, so it doesn’t melt the cheesecake), espresso beans, and coconut sugar. Pulse these ingredients until the beans are broken down to your preferred size. I like it a little chunky, but some might prefer them a little smoother for less crunch. Now you will spread this around over the top of your cheesecakes. Now put the cheesecakes into the refrigerator and enjoy once completely defrosted (probably another hour, but it will depend on the sizes you went with).
In addition to my family, these Dirty Chai Cheesecakes I’ve had taste-tested by three of my friends. Jen, Luz, and Patty. All loved it, and two of the three are dairy eaters, both of which I think were a little blown away by the deliciousness! As usual, this recipe is vegan-made and omni-approved!

My husband was pretty excited yesterday when he found out I’d made more of these! I hope you love them as we do and if so remember to leave a comment below, or take a pic and tag me on Instagram, @veggiesattiffanis.

Dirty Chai Cheesecake
Ingredients
For the crust...
- 1 cup dates
- 3/4 cup raw almonds
- 1/2 tsp cinnamon
- pinch sea salt
For the cheesecake...
- 1 1/2 cup raw cashews, soaked overnight or at least 4 hours (see notes for options to make more or less)
- 1/2 cup coconut cream (refrigerate a can of coonut milk overnight and the part which remains solid is the cream)
- 1/4 cup + 2 Tbsp coconut oil
- 1/2 cup maple syrup
- 2 Tbsp lemon juice
- 1 1/2 tsp vanilla extract
- 3/4 tsp ginger powder
- 3/4 tsp cardomon
- 3/4 tsp cinnamon
- 1/4 + 1/8 tsp allspice
- 1/8 tsp ground cloves (heaping)
- 1/8 tsp nutmeg (heaping)
- 1 1/2 Tbsp instant coffee (I use Nescafé) or for less coffee flavor start with 1 Tbsp and add more to taste
For the topping...
- 1/4 cup whole espresso beans
- 2 Tbsp melted coconut oil If you need to melt it first, make sure it's cooled to room temperature so you don't melt the cheesecake.
- 1 Tbsp coconut sugar
Instructions
- Line a 9" x 5" loaf pan with parchment paper, making sure some of the paper hangs over both sides. The ends of the pan can go without paper so long as they are both oiled.
- Add all crust ingredients to a food processor and mix until fine and a dough can be formed when pressed between fingers. Transfer mixture to the loaf pan and press down making an even crust on the bottom of the pan. Place in the freezer.
- Add all cheesecake ingredients to a blender (preferably high-speed) and mix on high until mixture is completely smooth, stopping to scrape the sides if needed. Remove the loaf pan from the freezer and pour the cheesecake mixture over the crust. Place in the freezer overnight or until completely frozen.
- When it's time, remove cheesecake from the freezer and let it sit at room temperature for about an hour. After an hour you should be able to lift the cheesecake out of the loaf pan by grabbing onto the parchment paper and pulling it out. If it doesn's seem like it's ready, wait a little longer until it can be removed without too much force.
- Cut the cheesecake into 8 equal squares or 6 equal bars (see notes for more options), it's important to cut it before it's defrosted completely. If the top of the cheesecake still seems completely frozen, let it sit at room temperature for about 10 or 15 minutes more before making the topping.
- Add all topping ingredients to the food processor. Make sure the coconut oil is melted but NOT hot (in the winter this is harder, right now mine is melted in the jar, but in another month it'll be solid). Pulse ingredients until mixed and beans are no longer whole. You can decide how "chunky" or fine you'd like the topping. Distribute the topping to the top of the cheesecake (it doesn't have to be completely covered, just a little spread out). Place the cheesecake into the refrigerator. When the middle is defrosted, and the topping has set, it's ready to enjoy!